
Hey, all you OTS Fitness Fans! Yours truly is now participating in a groupon deal. Look for it under personal training at Titan Fitness Studios. It’s a great deal, available in 2, 4, or 6 packs. Things have been very crazy the past month with life events but we are getting back on track here at OTS and would love to train YOU! When the internet gets up and running full time, there will be more informational posts – periodization, squat technique, nutrition, etc, etc. I am also working on hands-on educational group seminars, so keep your eyes and ears open!
-OTS
Author Archives: Dana
The Absentee Client (an enlightening rant in the key of @#!!&*#@!)
Dear YOU,
“You can do it!”
There’s an important word in that sentence – YOU. Where are you? Why aren’t you here, at our appointment? I set up the weights ahead of time and that helped make ME a little stronger, but the bar sitting on the rack isn’t making YOU any stronger. For us to achieve the goals you stated you would like to achieve, YOU need to be doing SOMETHING!
Let me be a little more clear: I’m not saying that you must use my weights, or my gym, or even any “gym” at all for certain goals. We may develop a fitness plan that involves bodyweight and outdoor activities. It is irrelevant to my point. Regardless of what the activities, exercises, or therapies are, YOU have to DO them at some point. Knowing the plan and doing the plan do not get the same results.
How do we know this? Because I enjoy teaching, here’s a simplified definition for you:
SUPERCOMPENSATION = your body’s ability to attain a post-workout fitness level greater than the previous fitness level, in order to be ready for the next workout.
Supercompensation sets in after the workout’s recovery period. That higher level will be sustained for a certain amount of time, depending on the individual, and is usually a few days. If you train again within the supercompensation period, you will again improve your fitness level, and so on up to peak genetic potential. If you do not train again within the supercompensation period (wait too many days before another workout), your body will say “use it or lose it” and you will regress back to your initial fitness level.

Stimulus, recovery, supercompensation, return to baseline
This is a long-winded way of saying GET GOING! For results to happen, you have to put the time in. And then you have to put the time in AGAIN, probably a few days later, sometimes even the next day and the next day after that depending on whether you are a novice or advanced athlete. Corrective exercises and rehab should be done every day or every other day. (There will be more information on this in a future follow-up post on periodization. I haven’t forgotten!).
Where is this all coming from? The recent slew of people telling me they exercise once a week and their goals are to lose 40 pounds, have ripped arms, have a six-pack stomach, and get back to playing a full-contact collision sport on the weekends. I’ve had people say they need to lose 30 pounds and want to train with me, but they only want to see me 2x A MONTH. They’ll “just go do stuff on their own”, like walk around the park on the weekends (if they aren’t too hung over), and check in with the plan twice a month for more advice. “Starting next month, because I don’t want to start this month, what with work and all.”
Let me know how that works for you….
Some people come to me with financial difficulty in affording a trainer. I understand. It’s your money to spend how you will. If you can afford it, investing in your health, pride, and happiness is a pretty good start, I’m just saying. (Despite the unfortunate realities of income vs the cost of better quality food choices and gym memberships, etc, the ability to improve your life via exercise should not be the sole realm of those who can afford a personal trainer. There are less expensive options.) Regardless, walking in the park on weekends is not enough stimulation to cause your body to improve. You are not 80 years old. Up the intensity, grandpa! Running 2 minutes to catch your train is not sufficient activity for the day. There is no magic pill for your goals. I repeat, THERE IS NO MAGIC PILL FOR YOUR GOALS. Whether or not you see me, whether or not you join a gym or an exercise class, you have to BE THERE. Show up and put in the time!
Despite my personal feelings towards group fitness classes and the gimmicks they use, they at least work at getting a lot of people off the couch and moving. I’m not going to tell you that you have to enjoy lifting weights. Many people find it tedious and boring (not anyone who experiences my witty banter, of course) and have no motivation to stick to a plan like that. That’s fine. If it makes you show up and participate, I’ll accept it for now. We can slowly wean you off that nonsense by explaining exactly what going to spin 2 nights a week and “rock hard abs 8 minute video” are NOT doing for progressing you towards your particular goals and ARE doing for progressing your physical therapist’s and orthopedic surgeon’s bank accounts (that’s a whole other post). And most people find they DO really enjoy lifting weights when they see the actual results that happen over time and the confidence that comes with being stronger and fitter.
Stop making excuses. Stop saying work got in the way. Don’t say you can’t find the time. Make the time. It may require a lifestyle modification. If the desire is really there, you will find a way. You might need to make a way. If you haven’t, you don’t really have the desire, you just like to pretend you do. I won’t program for someone who plans to exercise twice a month. These are YOUR goals, not mine. To summarize: GET YOUR A** IN HERE.
Love,
Only The Strong
Applying Corrective Exercises – Knowing is half the battle
When I evaluate a client or athlete, I’m searching for faulty movement patterns. A faulty movement pattern may be something like a squat that can’t be done without the lower back rounding (lumbar flexion) or a lunge where the knee falls in (knee valgus). They are pieces of movement that are usually unsafe or compensatory, and need to be corrected in order to safely and effectively progress with a workout. Often, there is complete unawareness of the faulty movement because it is what feels natural. As we will see, this is a large part of the success or failure of a corrective exercise.
In the words of Dr. Charlie Weingroff, DPT, ATC, CSCS, from a recent web lecture he presented, “corrective exercise is getting good at what we are not good at.” In order for a movement or exercise to have the nature of being “corrective”, it needs to correct something – namely, a movement we are performing incorrectly or poorly. In conjunction with this is the fact that – in order to know something is being done incorrectly – there needs to be a standard of what is correct. Myself and many other practitioners utilize the Functional Movement Screen (from Gray Cook) as a comparison tool for standards of non-painful movement, though it is not the only acceptable method. The FMS helps present what an end-state posture or correct movement pattern should look like as compared to the client or athlete’s movement.
Once the faulty movement has been assessed against the standard, it can be corrected. Step one is making a person aware, mentally AND physically, of the incorrect movement. As I said before, it is highly likely that this person was totally unaware of the compensation or restriction as it is just their natural way of moving. It is a subconscious dysfunction. But it is not enough to say “Hey, did you know you shift your weight to the right when you squat?” The corrective exercise chosen to repair the subconscious error should bring the person to the barrier or limit of their restriction so that they can also FEEL things being done incorrectly. You will have gone from a subconscious dysfunction to a conscious dysfunction, and this is the big step in being successful. A physical awareness of the error allows the person to correct themselves through frequent unsupervised practice and to relearn appropriate movement.
Now, like Charlie said, the exercise needs to have corrected something. We must reassess the deficiency. Corrective exercises can usually be done every day, as they don’t really require much recovery time. This allows for much consistent practice on the part of the client or athlete. After a week or two of practice, re-evaluate; and if the faulty movement is corrected, there is no need to continue with the corrective exercises. The person has gone from conscious dysfunction to conscious function, and is one step away from lasting success. Progress with the next step of the workout plan, whether that is to perform conditioning or more standard exercises, or move on to another pattern that needs to be corrected. After another brief interval, we check the first pattern again. Has it stayed corrected? If the proper corrective exercise was selected for the dysfunction, it was applied in the appropriate way, and the person was able to feel the dysfunction to practice self-correction until it was automatic (subconscious function), there should not be a need to continue doing it.
Corrective exercises should not be never-ending stories. When subconscious dysfunction has progressed to conscious dysfunction, correct movement can be practiced as a conscious function until it is a subconscious function. At that point, the movement should no longer be an issue and you have achieved lasting success!
A little motivation

What's Your Excuse?
ACTIVE REST – Dr. Crystal Joseph, D.C
Welcome to ACTIVE REST, the latest addition to Only The Strong Fitness! This is a new section consisting of interviews with intelligent and experienced members of the health and fitness community. This section may eventually be turned into a podcast, when I figure out how to do that, but until then my humble paraphrasing and editorial skills will have to suffice. For the first installment of ACTIVE REST I sat down and spoke with Dr. Crystal A. Joseph, D.C. Dr. Joseph is a Certified Chiropractic Sports Practitioner and a Certified Applied Kinesiologist. She has a background as an All-American high jumper, and is also a dancer. She was kind enough to answer my questions during some time on the stationary bike!
OTS: To be honest, I usually refer to you guys as “chiro-quack-tors”, no offense. Can you flesh out your background for us and what makes you different? What the heck is an Applied Kinesiologist??
DCJ: People don’t necessarily know what a “chiropractor” is or can be. They may only be familiar with the stereotype of “cracking backs” and having to endlessly return for more appointments without a foreseeable resolution of the problem. There are some old school doctors still stuck in this approach who do things by rote and are not actively continuing their education or digging deeper for the root of an issue. I believe in taking an integrative approach, which is what applied kinesiology is about. It’s not just about the spine – I take into account all body systems. In addition to a physical evaluation or adjustment that will include posture/gait analysis, breath assessment, full body neurological tests, deep tendon reflexes, blood pressure, and muscle testing, you will be asked to fill out a nutritional questionnaire and we will delve into the level of stress in your life, your level of activity, and so on. This is all to determine which system or systems should be addressed in your treatment for a total body resolution of the problem.
OTS: Yes, too often it seems like practitioners are just treating symptoms, not the underlying causes. I like the comprehensive approach and try to apply it when dealing with clients. Is there any body system you don’t touch on?
DCJ: Often patients come in for a musculoskeletal problem and I find other issues in the evaluation, especially in the case of athletes. They tend to feel everything is just physically based, but stress can put other body systems “out of whack”. I also frequently have patients referred for non-musculoskeletal problems, like PMS or indigestion, and I am able to help them because of my training in applied kinesiology and in naturopathic medicine. In kinesiology there is a belief that the body speaks a language and thus the relationship of the muscles to the functionality of systems and organs have been mapped out. For instance, during lingual testing of supplemental vitamins and through the nutritional questionnaire, I may find that a patient is lacking in a certain nutritional need and that is causing a body system to malfunction, which is then causing a musculoskeletal discomfort that can cascade through the body.
OTS: Example?
DCJ: Let’s look at a patient that comes in with a complaint of neck pain. A visual exam shows they have a forward head posture with rounded shoulders and need to stand up straighter and spend less time hunched over their computer.
OTS: Shocking…
DCJ: I know, I know… So, upon further physical exam, I find that they have very tight quadricep muscles, pulling their pelvis into anterior tilt and causing hyperlordosis and hyperkyphosis (increased curves) in the spine – the end result of those being forward head posture and neck pain. Without the addition of information from other biological systems, I might just have them work on their muscle flexibility. But tight quads may not just be a stretching issue. Your quadricep muscles are also affected by the level of absorption of minerals in the small intestine. Delving into their eating habits and stress levels may determine they are not getting what they need nutritionally. For instance, as our age increases, our level of stomach acid production decreases, meaning we break our food down less and have less opportunity to get the vitamins and minerals needed. This patient may need to supplement their diet with probiotics or HCL (hydrochloric acid supplement to help break down food in the stomach) to better absorb the minerals they were missing. There is then less effect on their quadricep muscles, which will have increased flexibility, allowing their pelvis to realign correctly, ridding them of hyperlordosis in their lower back and hyperkyphosis in their upper back. That makes it easier and more effective to use corrective exercises or manual adjustment to realign the forward head posture and relieves them of their neck pain!
With that said, I do refer patients to outside sources if necessary. Besides biological systems, I find it very useful to stay in touch with those who can help the patient deal with mental and emotional issues that may be causing a physical complaint. In the case of an athlete, that will be the athletic trainer, the coaches, a personal trainer, or possibly a school counselor. These people are in constant contact with the patient, know them very well and may be close with them, and can assist in reducing or removing the cause of the stress. It’s often a team effort.
OTS: Agreed. As an athletic trainer I am in constant contact with PCPs, orthopedists, and other specialists, including school counselors. Athletes especially tend to ignore the effect mental and emotional stress can have physically. As a personal trainer, I need to pay close attention to a client’s work and home balance and it is often difficult to convince them to re-balance.
DCJ: For me, that’s what it is all about: knowing what a person does or is trying to do and breaking down what they are saying into what their hindrance is. Then, it’s up to us guide them and get them to BALANCE themselves, whatever that may mean and by whatever means necessary. I like to impart to them some wisdom that was given to me by my mentor, Dr. Eugene Charles, which was that “health is a process, not an event”.
OTS: Very true. In fact, I think I’m going to steal that quote for future use! Too many people are under the influence of commercial media, where everything has a quick fix and problems are solved in 30 minutes or less. 10 minutes for abs, etc. I spend a good deal of time helping clients and athletes understand the process and why we may be starting our route in an unexpected or seemingly unrelated body area. It’s good to have another voice in the mix passing on the same idea.
DCJ: It’s great to have personal trainers to refer patients to that “get it”. It’s also great to have you guys on the team as extra guidance for myself. I’ve had Personal Trainers help me planning my own workouts, targeting the real roots of an issue and adding functionality, and that is a large part of what has helped me continue as a competitive runner. I transfer those ideas to my patients, especially the functionality of an exercise. I have worked with personal trainers to have a new mother exercise with off-centered weight loads to help her get better at handling the shifting weight of a baby. It’s not just “crunches”; it’s a real, useful, and safe core/trunk exercise that will really translate for her. You guys keep up-to-date on all of that stuff and are a good conduit of that information for me. It’s key as a professional to sometimes have outside guidance and be integrated as a team with professionals in related fields. We each add a layer of expertise for the patient/client to be able to achieve a higher level of accomplishment that he or she can’t do alone. It may be a nutritional aide, a stretching technique, an agility drill, or a balance and proprioceptive technique that will assist them in accomplishing an activity of daily living.
OTS: Absolutely true. When I saw you for my hamstring issues and was handed a nutritional questionnaire, it was rather eye-opening, and now it seems pretty silly that I hadn’t thought much about that stuff before. So thank you for that. And thank you for your time answering my questions and helping OTSFitness Readers get more familiar with the ideas behind good chiropractic medicine and Applied Kinesiology. I’ll let you get on with your workout now. Thanks so much!
DCJ: You’re very welcome!
Dr. Joseph is located at 200 West 54th St, between Broadway and 7th Aves, in NYC. She can be reached at 917-828-6733 or DrCrystalJo@gmail.com for appointments.
An Apple A Day…
You know the rest. But no, this isn’t a nutrition posting; it’s actually some information about shoulder health and safety. As these exercises can also be done for hypertrophy to improve a bodybuilders physique, the topic has been double categorized under “Fitness Tips” and “Corrective Exercises”. What I’m writing about today are exercises for your Rotator Cuff musculature.
What is the Rotator Cuff? It is a group of 4 muscles in and around your shoulder joint. The area referred to as the shoulder is complex and involves multiple joint interfaces, but for our purposes we will be referring to the glenohumeral joint (the ball-and-socket), as that is what the muscles primarily affect when they act. Those muscles are:
Supraspinatus: acts to abduct your arm (raise it up to the side)
Infraspinatus: acts to externally rotate your upper arm (turning out your pockets)
Teres Minor: also externally rotates your upper arm
Subscapularis: acts to internally rotate your upper arm (wrapping your arms around yourself)

View of the RC
Collectively known as the SITS muscles, they act together to stabilize the “ball” (humeral head) of your upper arm (humerus) in the “socket” (glenoid fossa) of your shoulder blade (scapula). When these muscles are injured or weak, the ball can shift around in the socket, causing further weakness and instability in the control of your arm. Often, a chronically unstable shoulder leads to injuries such as subluxations, tendinitis, or neuropathies.
Who wants that?! No one! So what should you do to ensure a stable shoulder joint and prevent putting your orthopedist’s children through college? Here are a few exercises to add to your workouts that should be done every other day or so (every day if you have a history of ball-and-socket problems). They should be done for volume (high reps) with a lower intensity (weight) because these are postural muscles, programmed for the high endurance job of maintaining the same position all day. They should also be done at the end of the workout to avoid them being too fatigued to assist you in correctly executing your upper body exercises that day.
1) Empty Can (for supraspinatus): stand upright with good posture, arms down at your sides. As you raise your arms up and out on a 45 degree angle (not straight to the side, not straight out in front), keep your thumbs pointed towards the ground (as if you were emptying a can of its contents). Do not raise your arms higher than shoulder height and, in fact, it’s not necessary to go more than 30 degrees up because that is when your deltoid muscle takes over the movement from the supraspinatus. Traditionally the exercise is done to shoulder height, though. Perform 3 sets of 10-15 repetitions. Add weight conservatively as the exercise becomes easier.
Empty Can
Empty Can Finish
Empty Can Sideview
2) Side-Lying External Rotation (for infraspinatus/teres minor): lie on one side on the ground or a bench, say your left side. Have a rolled up towel held under your right arm, against your side, to keep your arm from being flush against your side. This puts the shoulder in a better anatomical position for the exercise. Begin with your right elbow bent to 90 degrees and your forearm across your abdomen. Keeping your upper arm in line with your torso the whole time, roll your right forearm out away from your torso, towards the ceiling and then slowly back down again. Do not rotate too far – if your right hand is going behind you, you are way too far. Perform 3 sets of 10-15 repetitions. Add weight conservatively as the exercise becomes easier.

Side-Lying Dumbbell External Rotation

Side-Lying Dumbbell External Rotation Upper
3) Standing 90-90 External Rotation (for infraspinatus/teres minor): this is one of the many variations on external rotation exercises. Stand upright with good posture (shoulder blades back) with your back against a wall. Raise your arms up to 90 degrees (but not more) against the wall. Bend your elbows to 90 degrees and place your forearms and the back of your hands flat against the wall. Slowly let gravity rotate your arms downwards so your palms are facing the floor (elbows still bent) and then actively roll them back up to the wall again. Perform 3 sets of 10-15 repetitions. Add weight conservatively as the exercise becomes easier.

Standing Dumbbell External Rotation

Standing DB External Rotation
It’s rare that anyone needs to exercise their subscapularis, as most people’s internal rotators are overly developed and tight. But for the sake of being thorough, here is one exercise. Do not overdo it. It is far more common to need work on the external rotators mentioned above. Always do more external rotator work than internal unless you have a diagnosed injury.
4) Standing Cable Internal Rotation (for subscapularis): stand with a cable machine to your right side, cable in your right hand, rolled up towel (again) under your right armpit. Maintaining the same good posture and arm positioning as for the Side-Lying rotation exercise, pull the cable and rotate your forearm in towards your body it touches your abdomen. Then slowly release the cable back out again. Your elbow should always be bent to 90 degrees, as if your forearm were sliding along an invisible table top in front of you. Do not let the cable yank your arm out, and do not rotate out to the side past your torso. Perform 3 sets of 10-15 repetitions. Add weight conservatively as the exercise becomes easier. **This can also be done as another external rotation variation if you turn and face the other way.

Standing Cable Rotation

Standing Cable Rotation2
Now you have a starter packet for shoulder health and safety. Not only will these exercises help keep you out of the doctor’s office, but they will make you stronger. When your weightlifting hits a plateau, make sure you are keeping up your rotator cuff strength, as that step has been shown to reinvigorate the upper body’s ability to handle heavier weight! Stable little muscles make bigger muscles fire more effectively and keep optimal alignment for torque, which means you can push more people around. Happy lifting!
What To Do When You Don’t Know What To Do – Part II
So you’ve figured out the time frame for your macrocycle that will get you to peak performance around competition/event time. Your transition phase will depend on how conditioned you usually are, the intensity of your event(s), and the time frame until your next competitive phase. For instance, I took two weeks at the end of my rugby season to do nothing but rest, foam roll, stretch, and mobilize my ankles and hips. (It was amazing.)
The remaining months are your preparation phase, which is divided into two parts. General preparation refers to overall physical conditioning (you could think of it as general physical preparedness, or GPP) and often initially includes setting a solid aerobic base for future exercise. It can also include general mobility, flexibility, and correction of imbalances that occur over a competitive season. Think of this time as making yourself more of a “Renaissance Man/Woman” at first, with an eye towards your weaknesses and ultimate goals. This is also usually when hypertrophy training would take place. Get a better cardio base, balance out your imbalances, and get bigger muscles. Often these workouts will be higher volume (more reps) and lower intensity.
As you progress through your general preparation, you can change the emphasis of your workouts from endurance and hypertrophy to strength. You got fitter and bigger, now use that size and endurance to lift some heavy sh*t and get stronger. Accordingly, your volume will decrease (less reps) and your intensity will increase (darn heavy). You will also begin to integrate some sport specific activities (certain skills or drills that need work) but will not overdo the volume on those activities.
You’ve gotten fitter, you’ve gotten bigger, and you’ve gotten stronger, now get faster. The last section of the general preparation phase is most often a power phase. These workouts will be very high intensity for low reps to prevent overuse injuries and central nervous system burnout. At this time you will also fully integrate sport specific drills, bringing you into the specific preparation part of the preparation phase. This is when you really focus in on exactly the movements and skills needed for your competition and very little else.
Each focus of the general and specific preparation portions of the preparation phase, in case you haven’t guessed, is a mesocycle. A mesocycle is simply the time frame for whatever you are focusing on in your workouts (ie. endurance, strength, power), and can last anywhere from 2 weeks to months. The number of mesocycles in your preparation phase depends on how many different things you will be focusing on at different times, which will also determine the mesocycle length. Periodization is traditionally linear (high volume/low intensity endurance –> low volume/high intensity power) but can be random as well.
At last, you’ve planned your preparation time frame and decided what you want to work on during that time – whether it’s strength, power, strength-endurance, or all of the above. Now for each mesocycle, planning your microcycles is simply making your weekly workout plan. Pick some exercises you want to work on to do your strength routine, decide whether you want do add some prowler work or burpees for your endurance, determine whether or not you are strong enough for proper box jumps during your power phase, etc; and put down the desired reps/sets/rest scheme.
Of course, you really only need to plan the first portion of your general preparedness because subsequent workouts will depend on your progress during each mesocycle. And don’t be afraid to edit as you go. If you didn’t make it as far as you needed or wanted do during your strength phase, add another week or two or three, or come back to that in a different mesocycle again later if you have the time and feel it is crucial. Lastly, be sure to program in deload time so you can make it to your competition phase in one solid, ass-kicking piece! Happy programming!
What To Do When You Don’t Know What To Do – Part I
Fall sports seasons are finally over – don’t be fooled by the 50 degree December weather – and that means it’s time to plan the off-season. I’ll be honest with you, folks; sitting down and figuring out a workout plan for myself for the next several months is low on my list of favorite activities. But it must be done so that I don’t end up as one of those people wandering aimlessly around the gym, doing a set here and there, hanging out on the bench and texting, etc, etc…. If you already ARE one of those people, put the magazine away, get off the stationary bike, and let’s talk about periodization.
Periodization can, at first, seem rather complex and, in the case of elite competitive athletes, be dizzyingly intricate. But the concept itself is actually simple: training for different physical goals during consecutive time frames throughout the year. This can be adapted for ANYONE with any goals!
The first steps are to nail down your ultimate goal(s) and determine the time frame for achieving the goal(s). For instance, you may be an athlete preparing for your next competitive season with specific weaknesses to hammer out, or someone preparing for an important life event who wants to fine tune their physique. Once you have the goals and time frame, you can plan your cycles.
Macrocycle: usually about a year’s time, but can be shorter
Mesocycles: anywhere from weeks to months long depending on how many different goals you have
Microcycles: usually a week for ease of planning workouts
The macrocycle usually has 3 parts: preparation, competition, and transition. Preparation will be general and specific and gets you ready for your main event. Competition can be a single event, a few events, or an entire season lasting several months. Transition is the rest period needed after all that time of training and competing. As this is cyclical, you then come back around again to preparation, where you evaluate a new set of goals and a new time frame!
The length of your preparation phase depends on whether you want to be at peak performance (or physique) at the beginning of the competition phase or at some point during the middle or end (ie. playoffs). Decide this and then you can split the preparation phase into its sections: general preparation and specific preparation.
The Deadlift
Recently I had a discussion (on my end – a very heated argument on his end) with a coworker who is a sub-par personal trainer. Degrees in kinesiology do not always a great personal trainer make…. Anyway, we were debating the proper way to complete a deadlift. All of the misinformation that was floating around has prompted this post – to inoculate you readers against the idiocy I experienced last week.
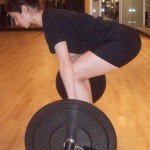
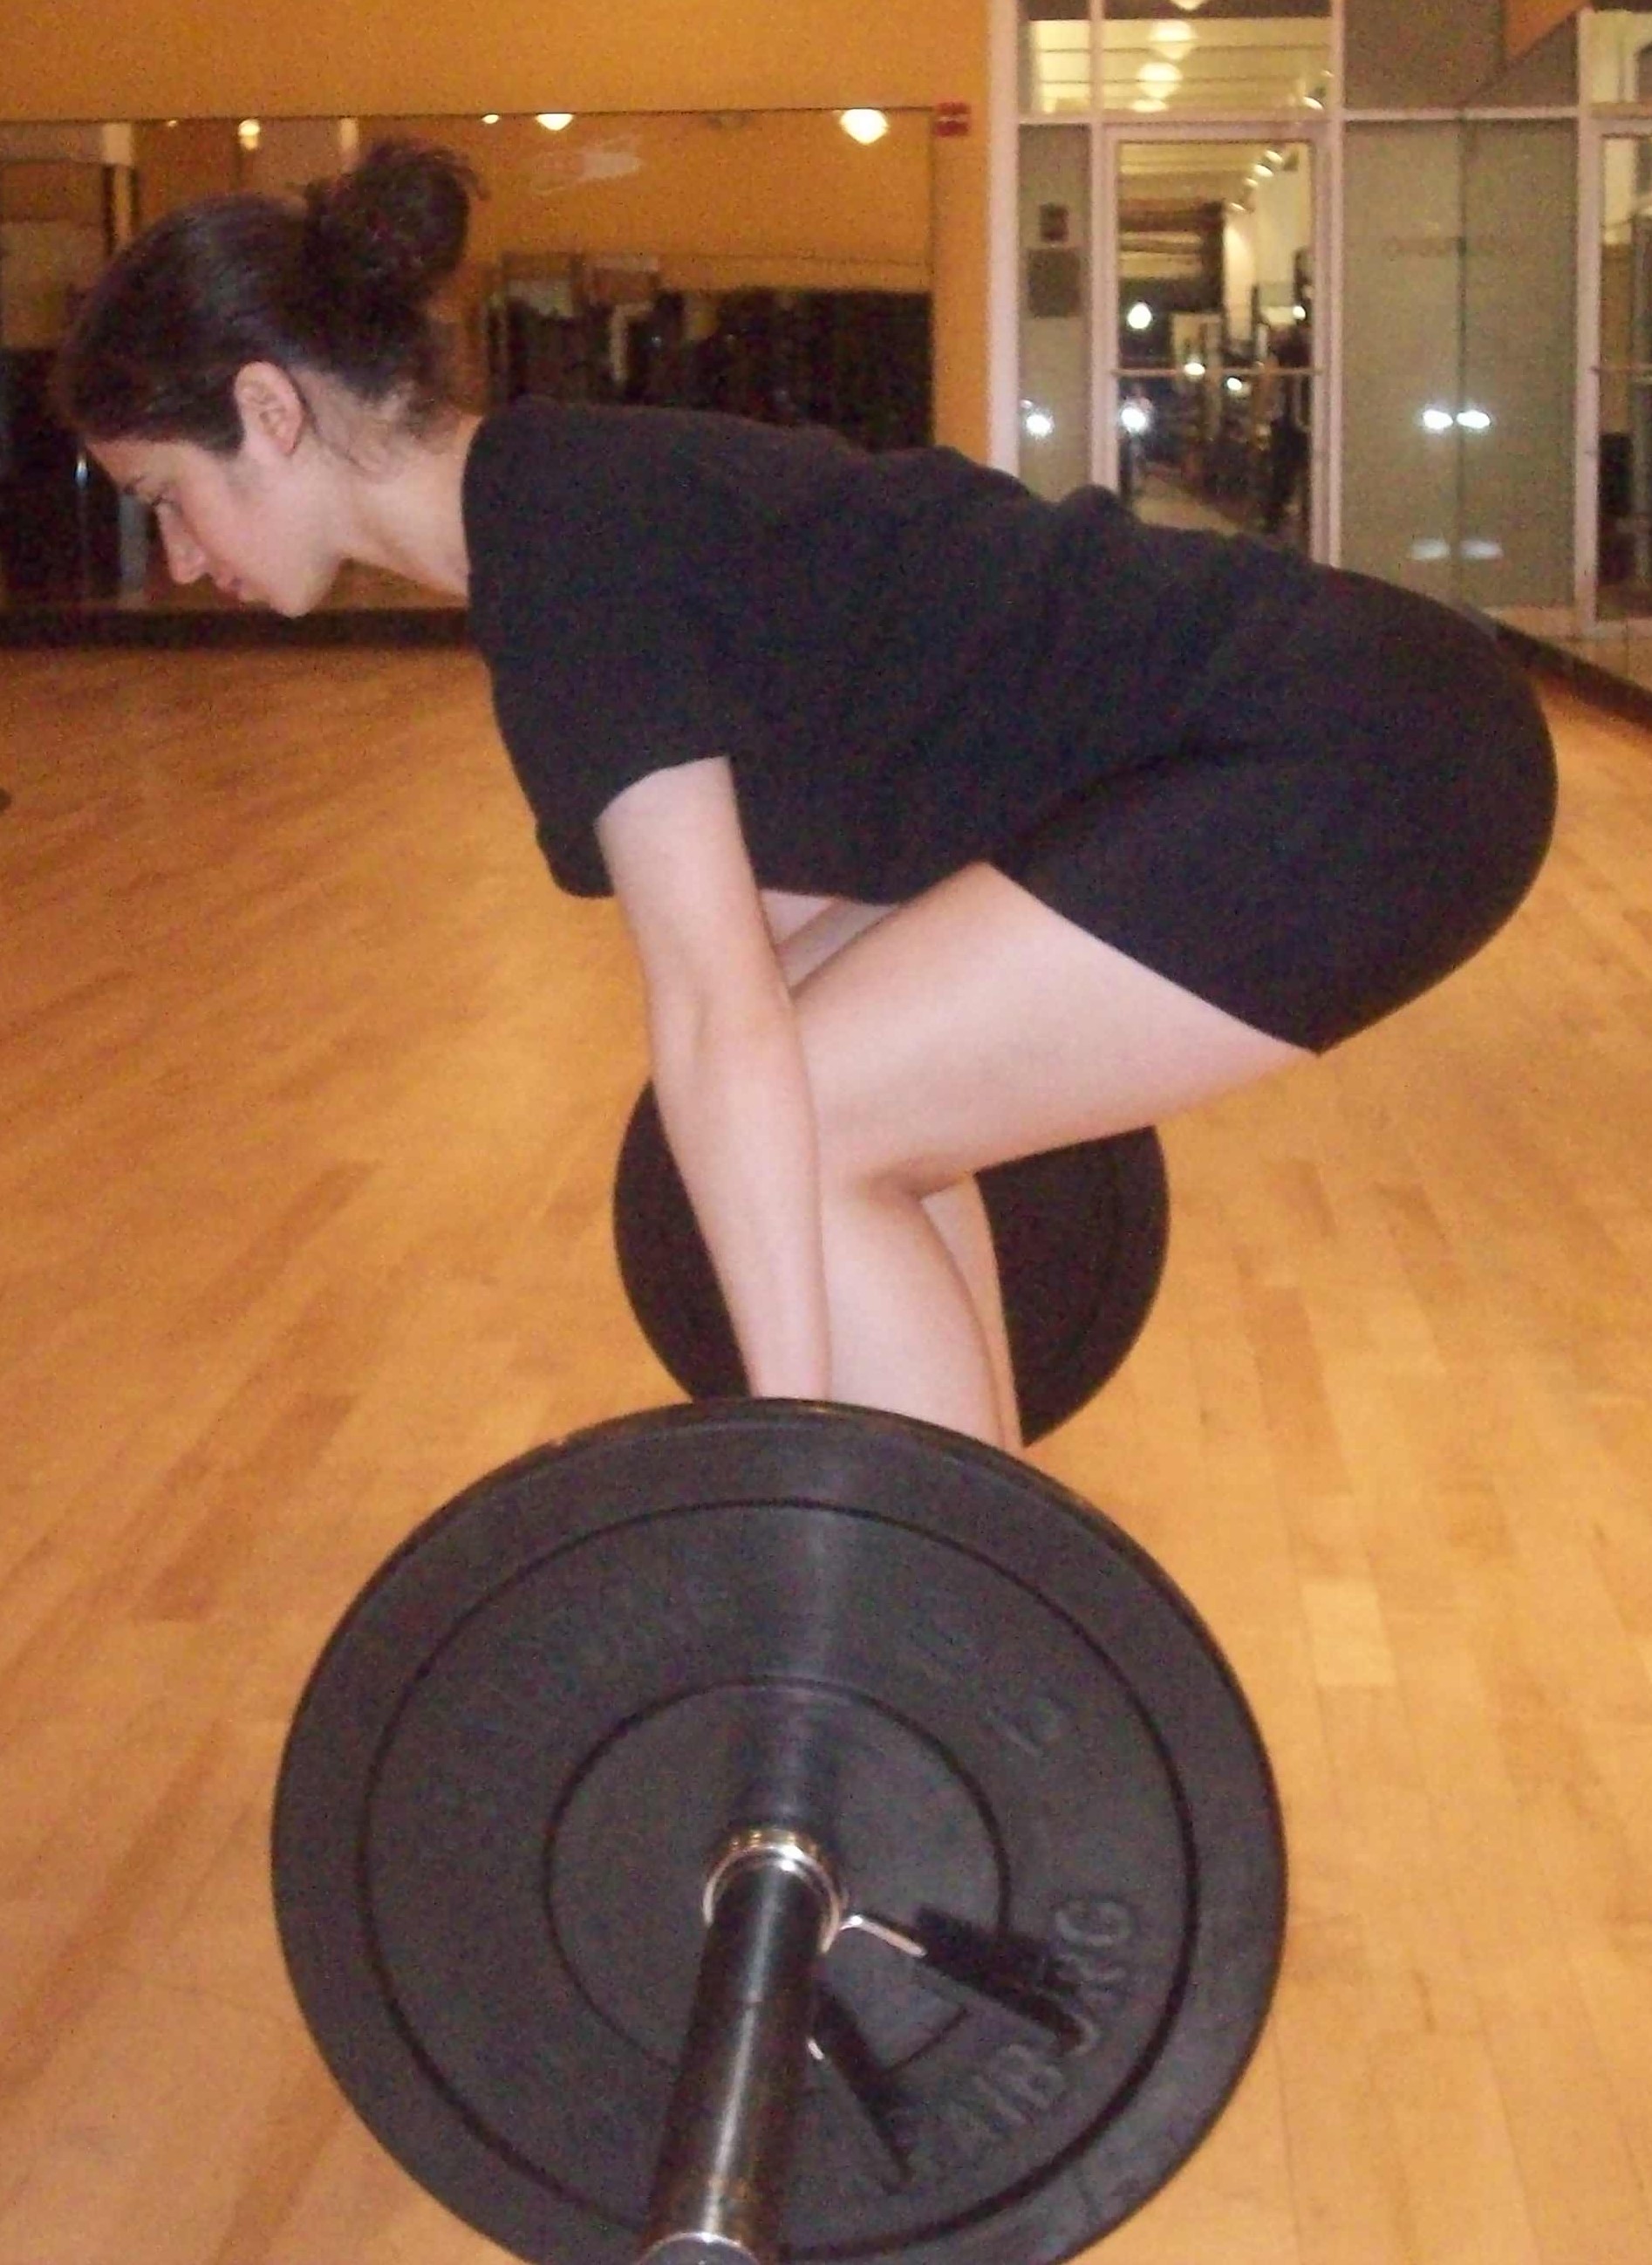
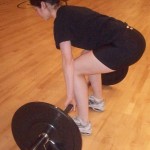
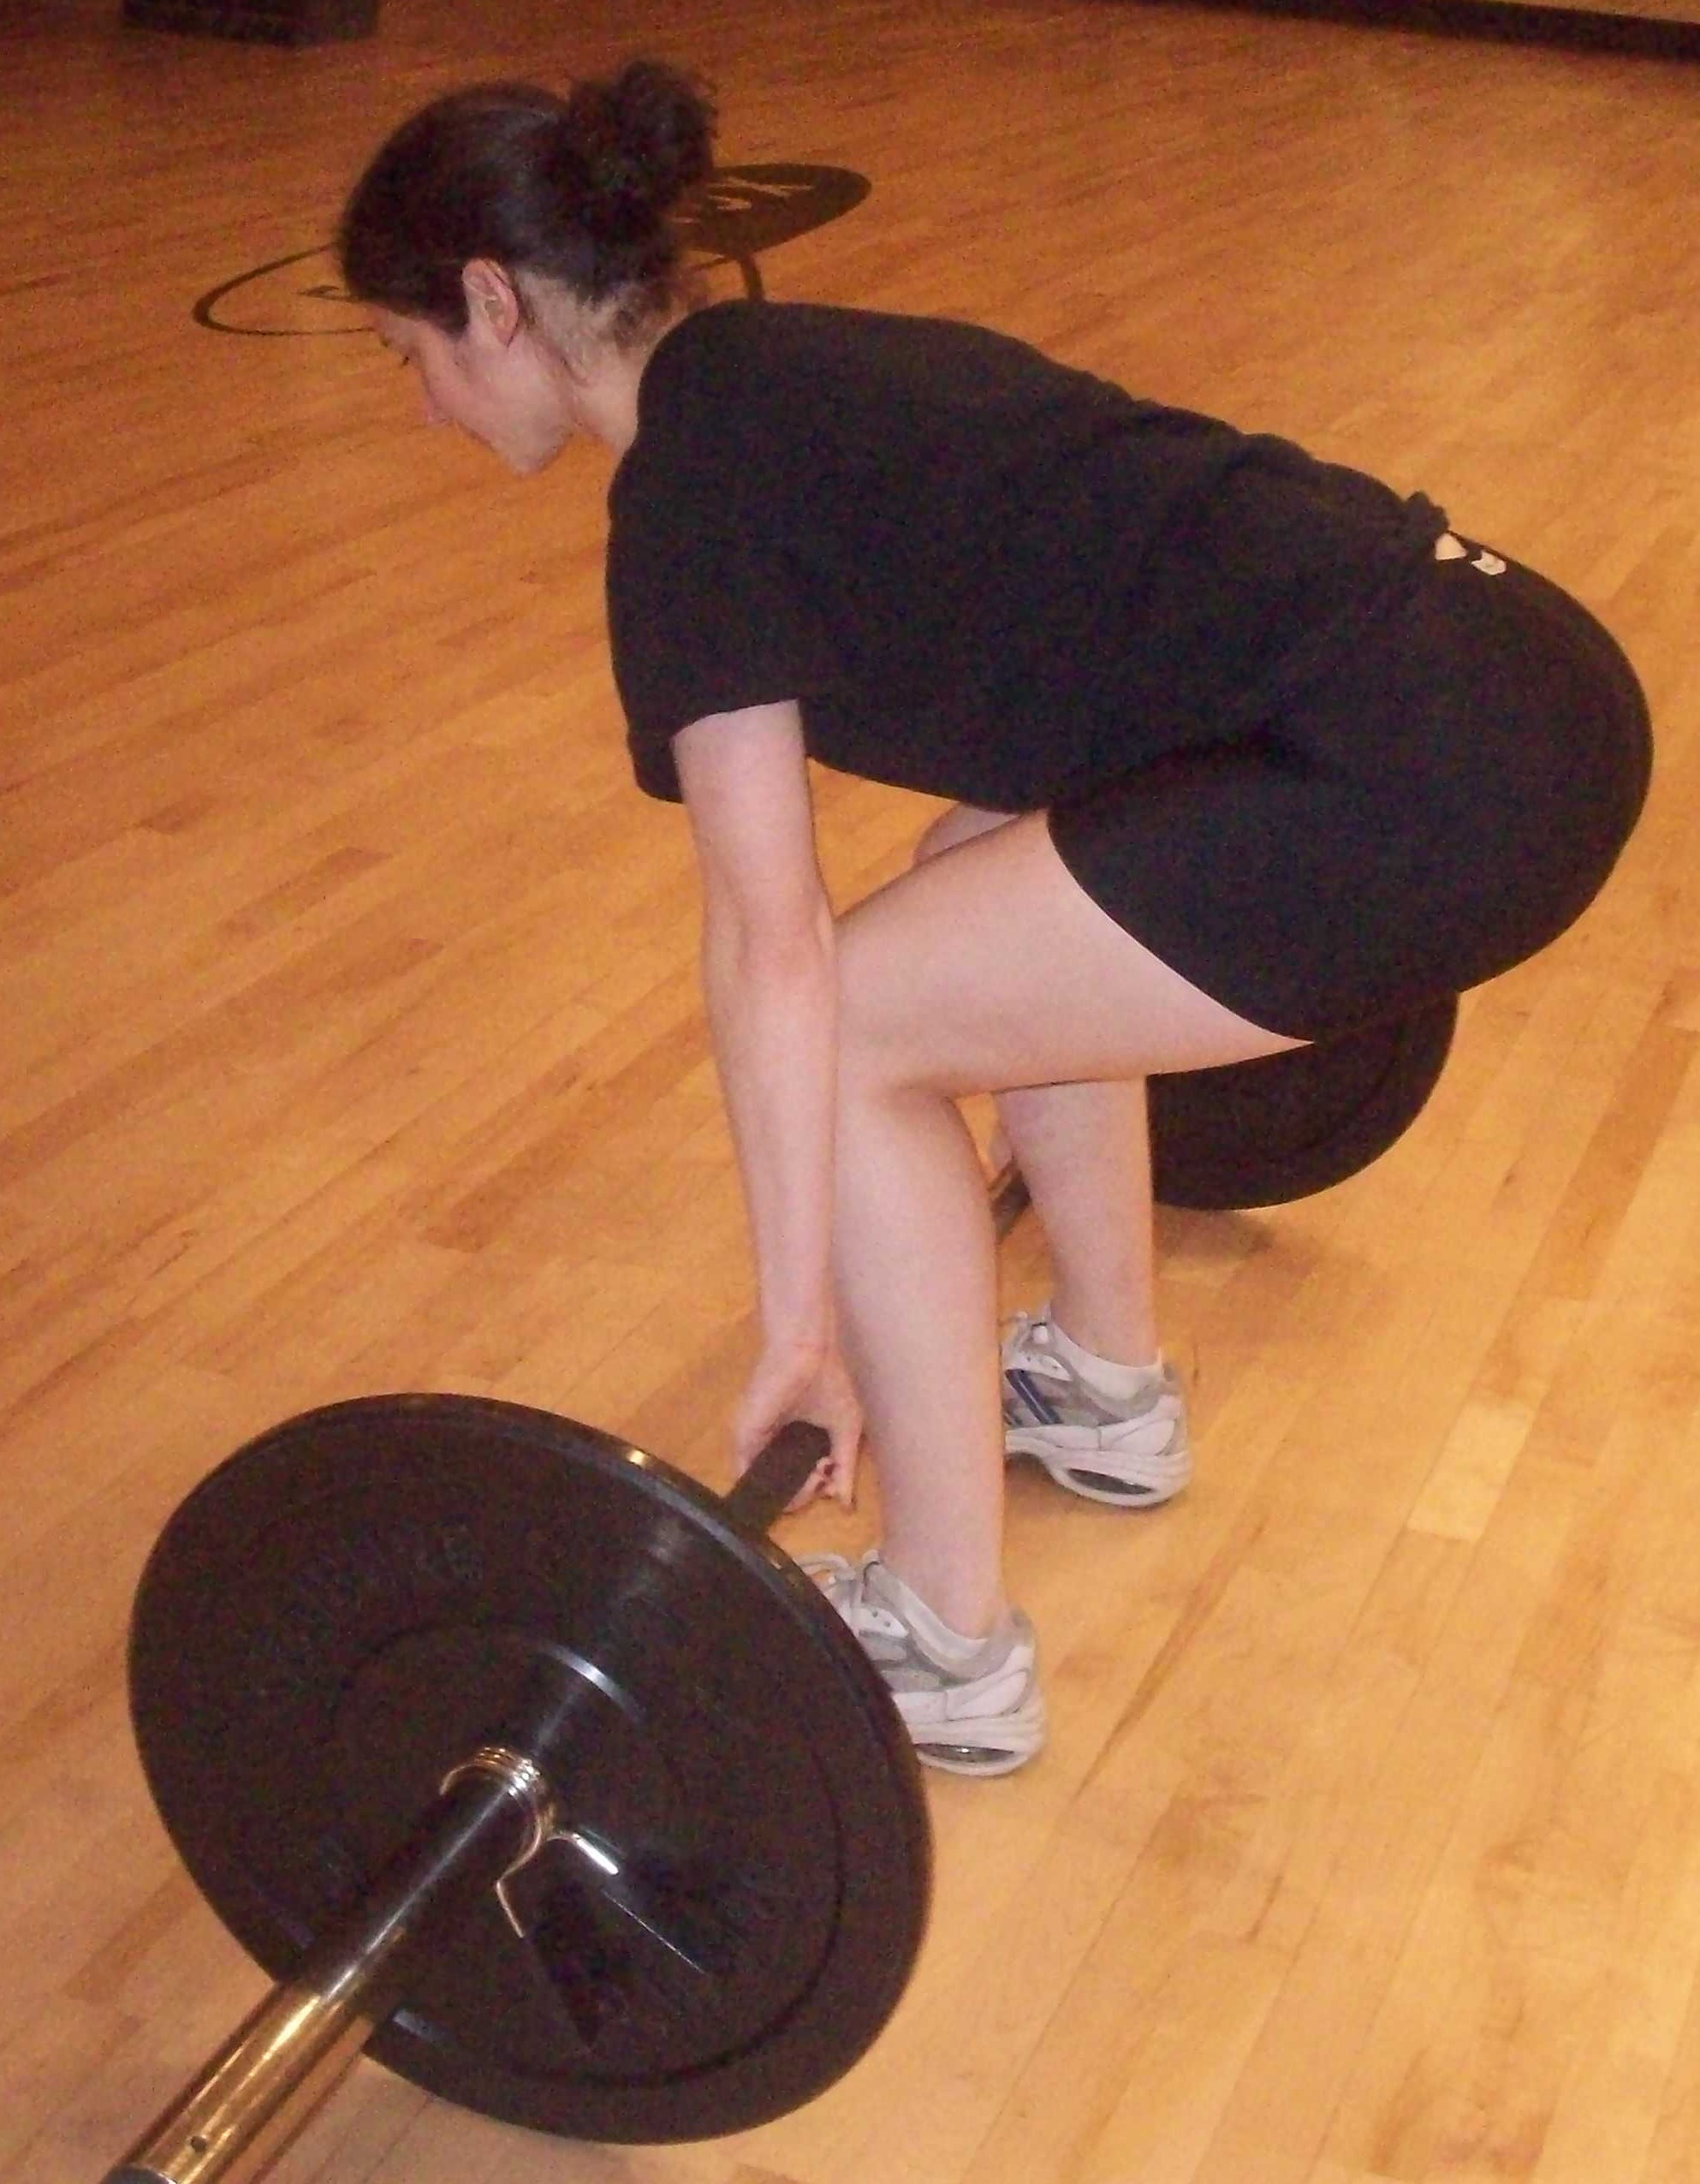
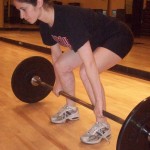
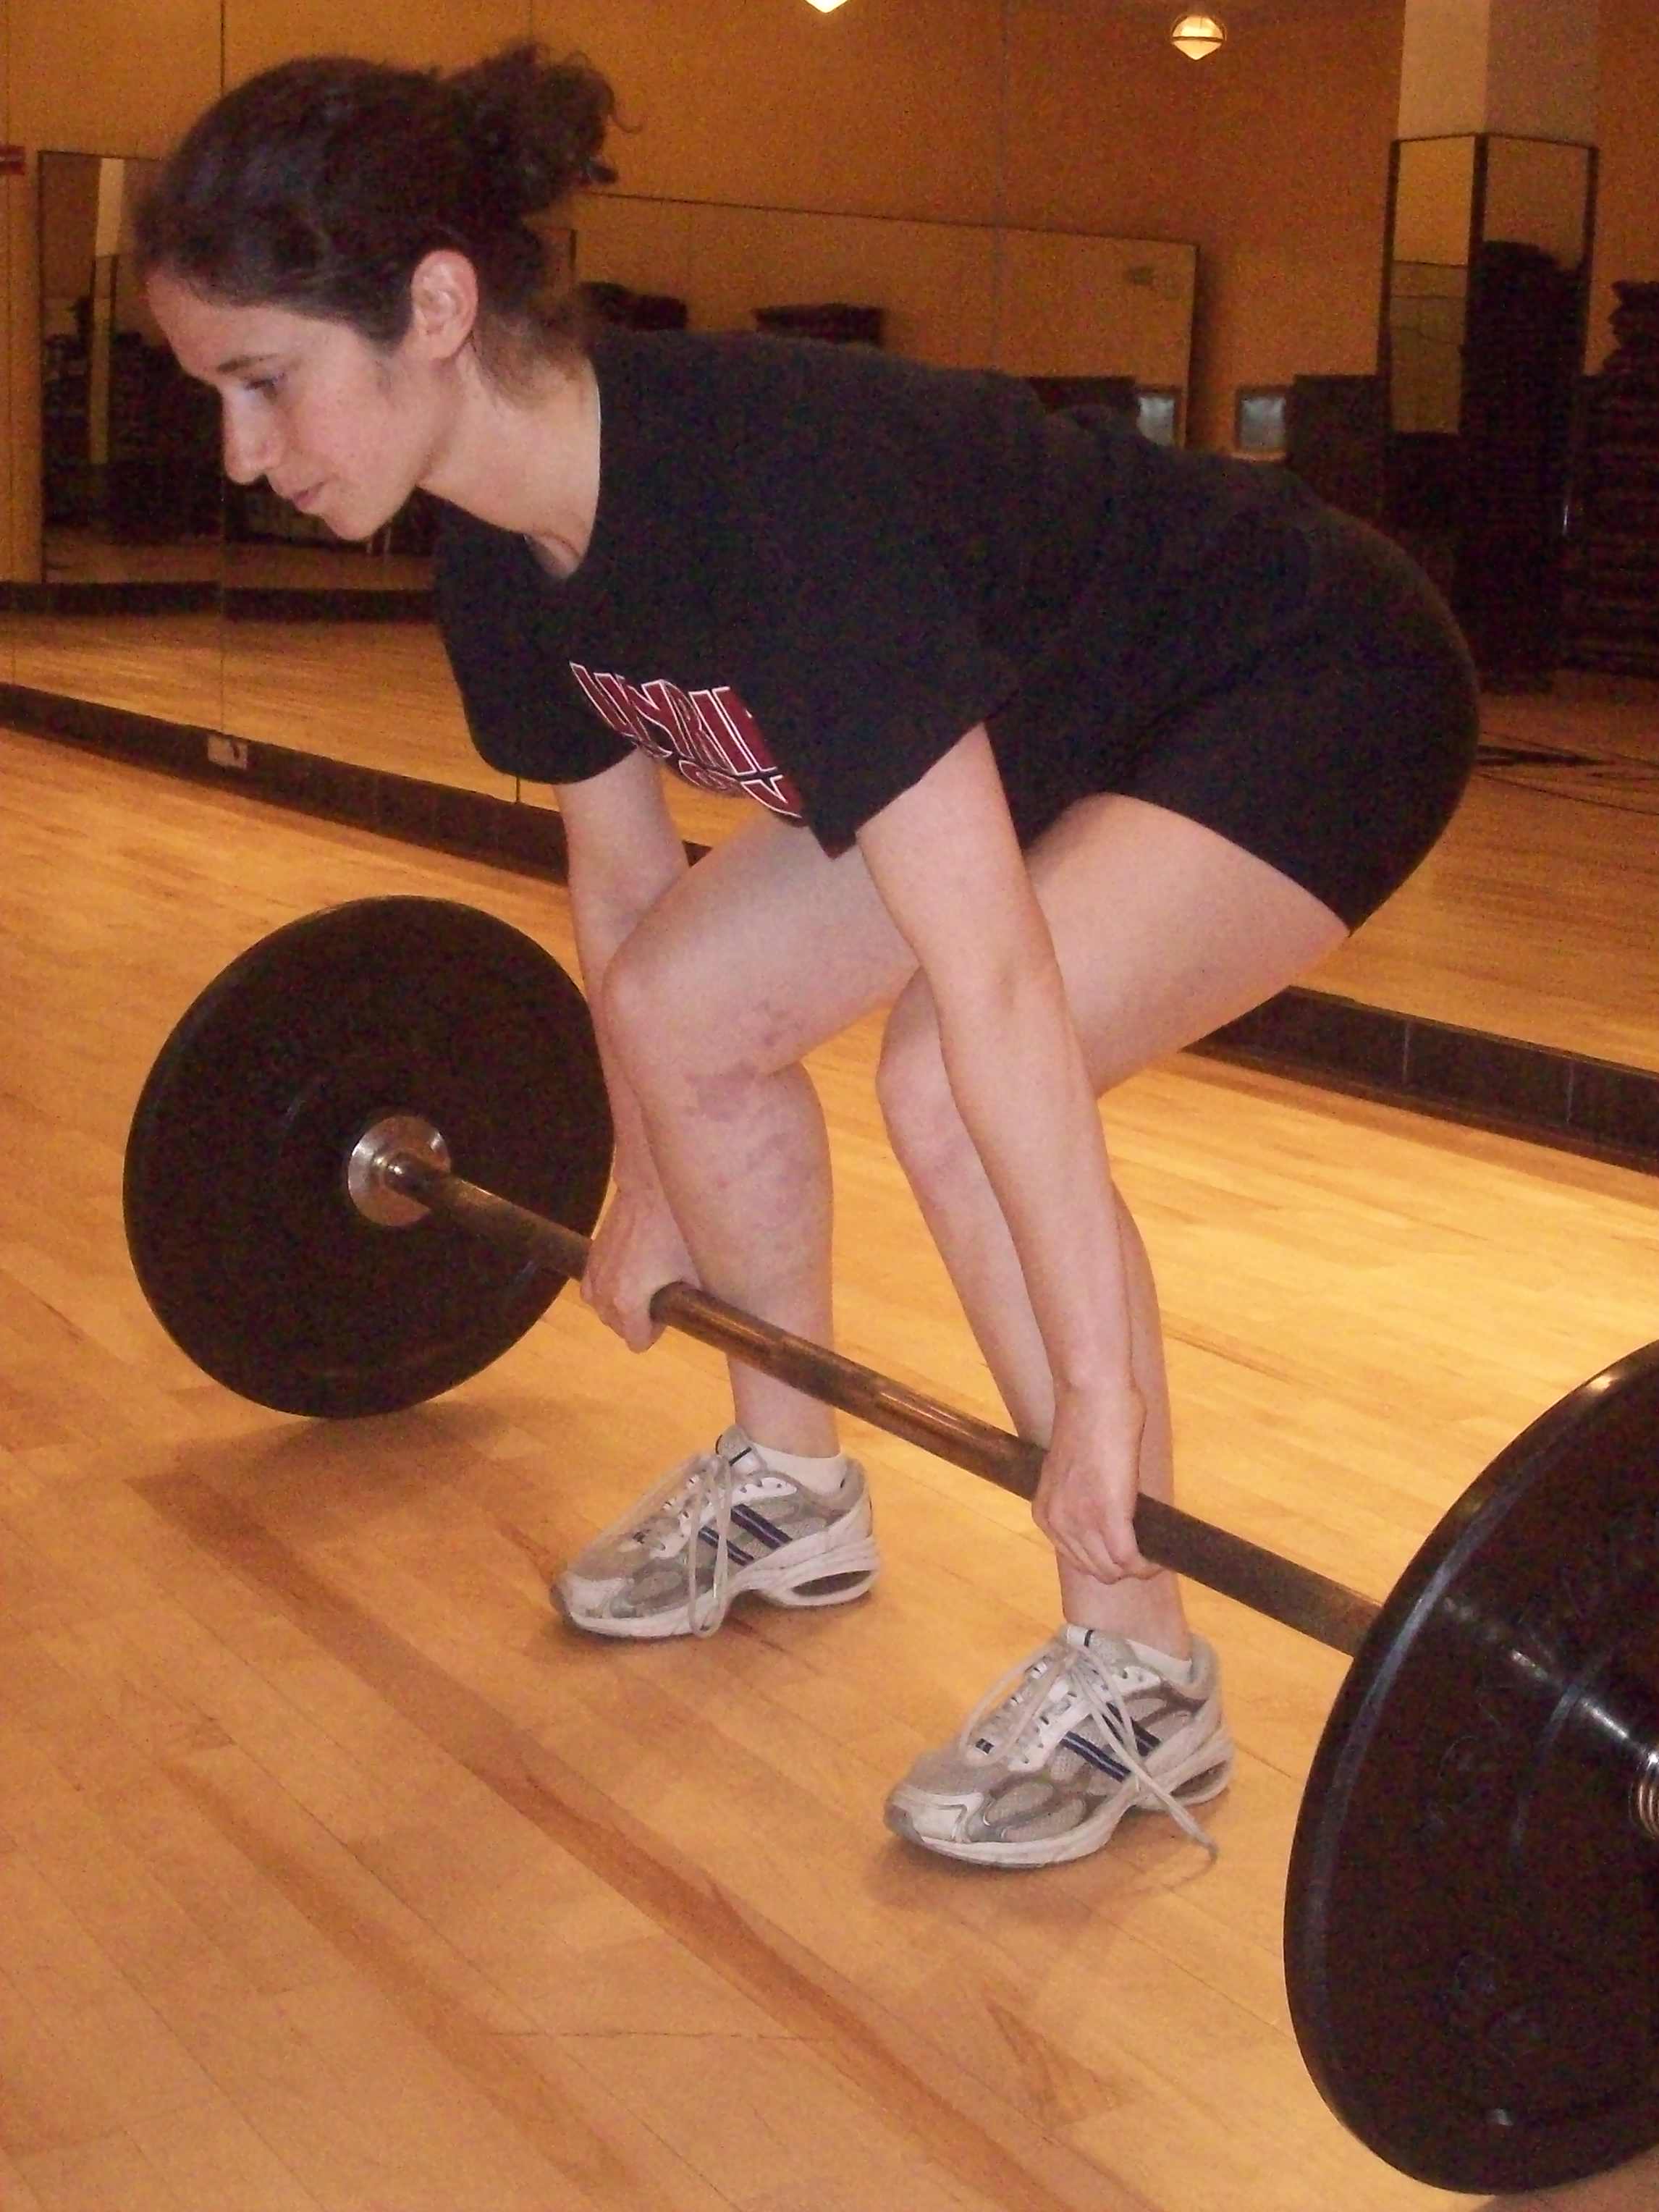
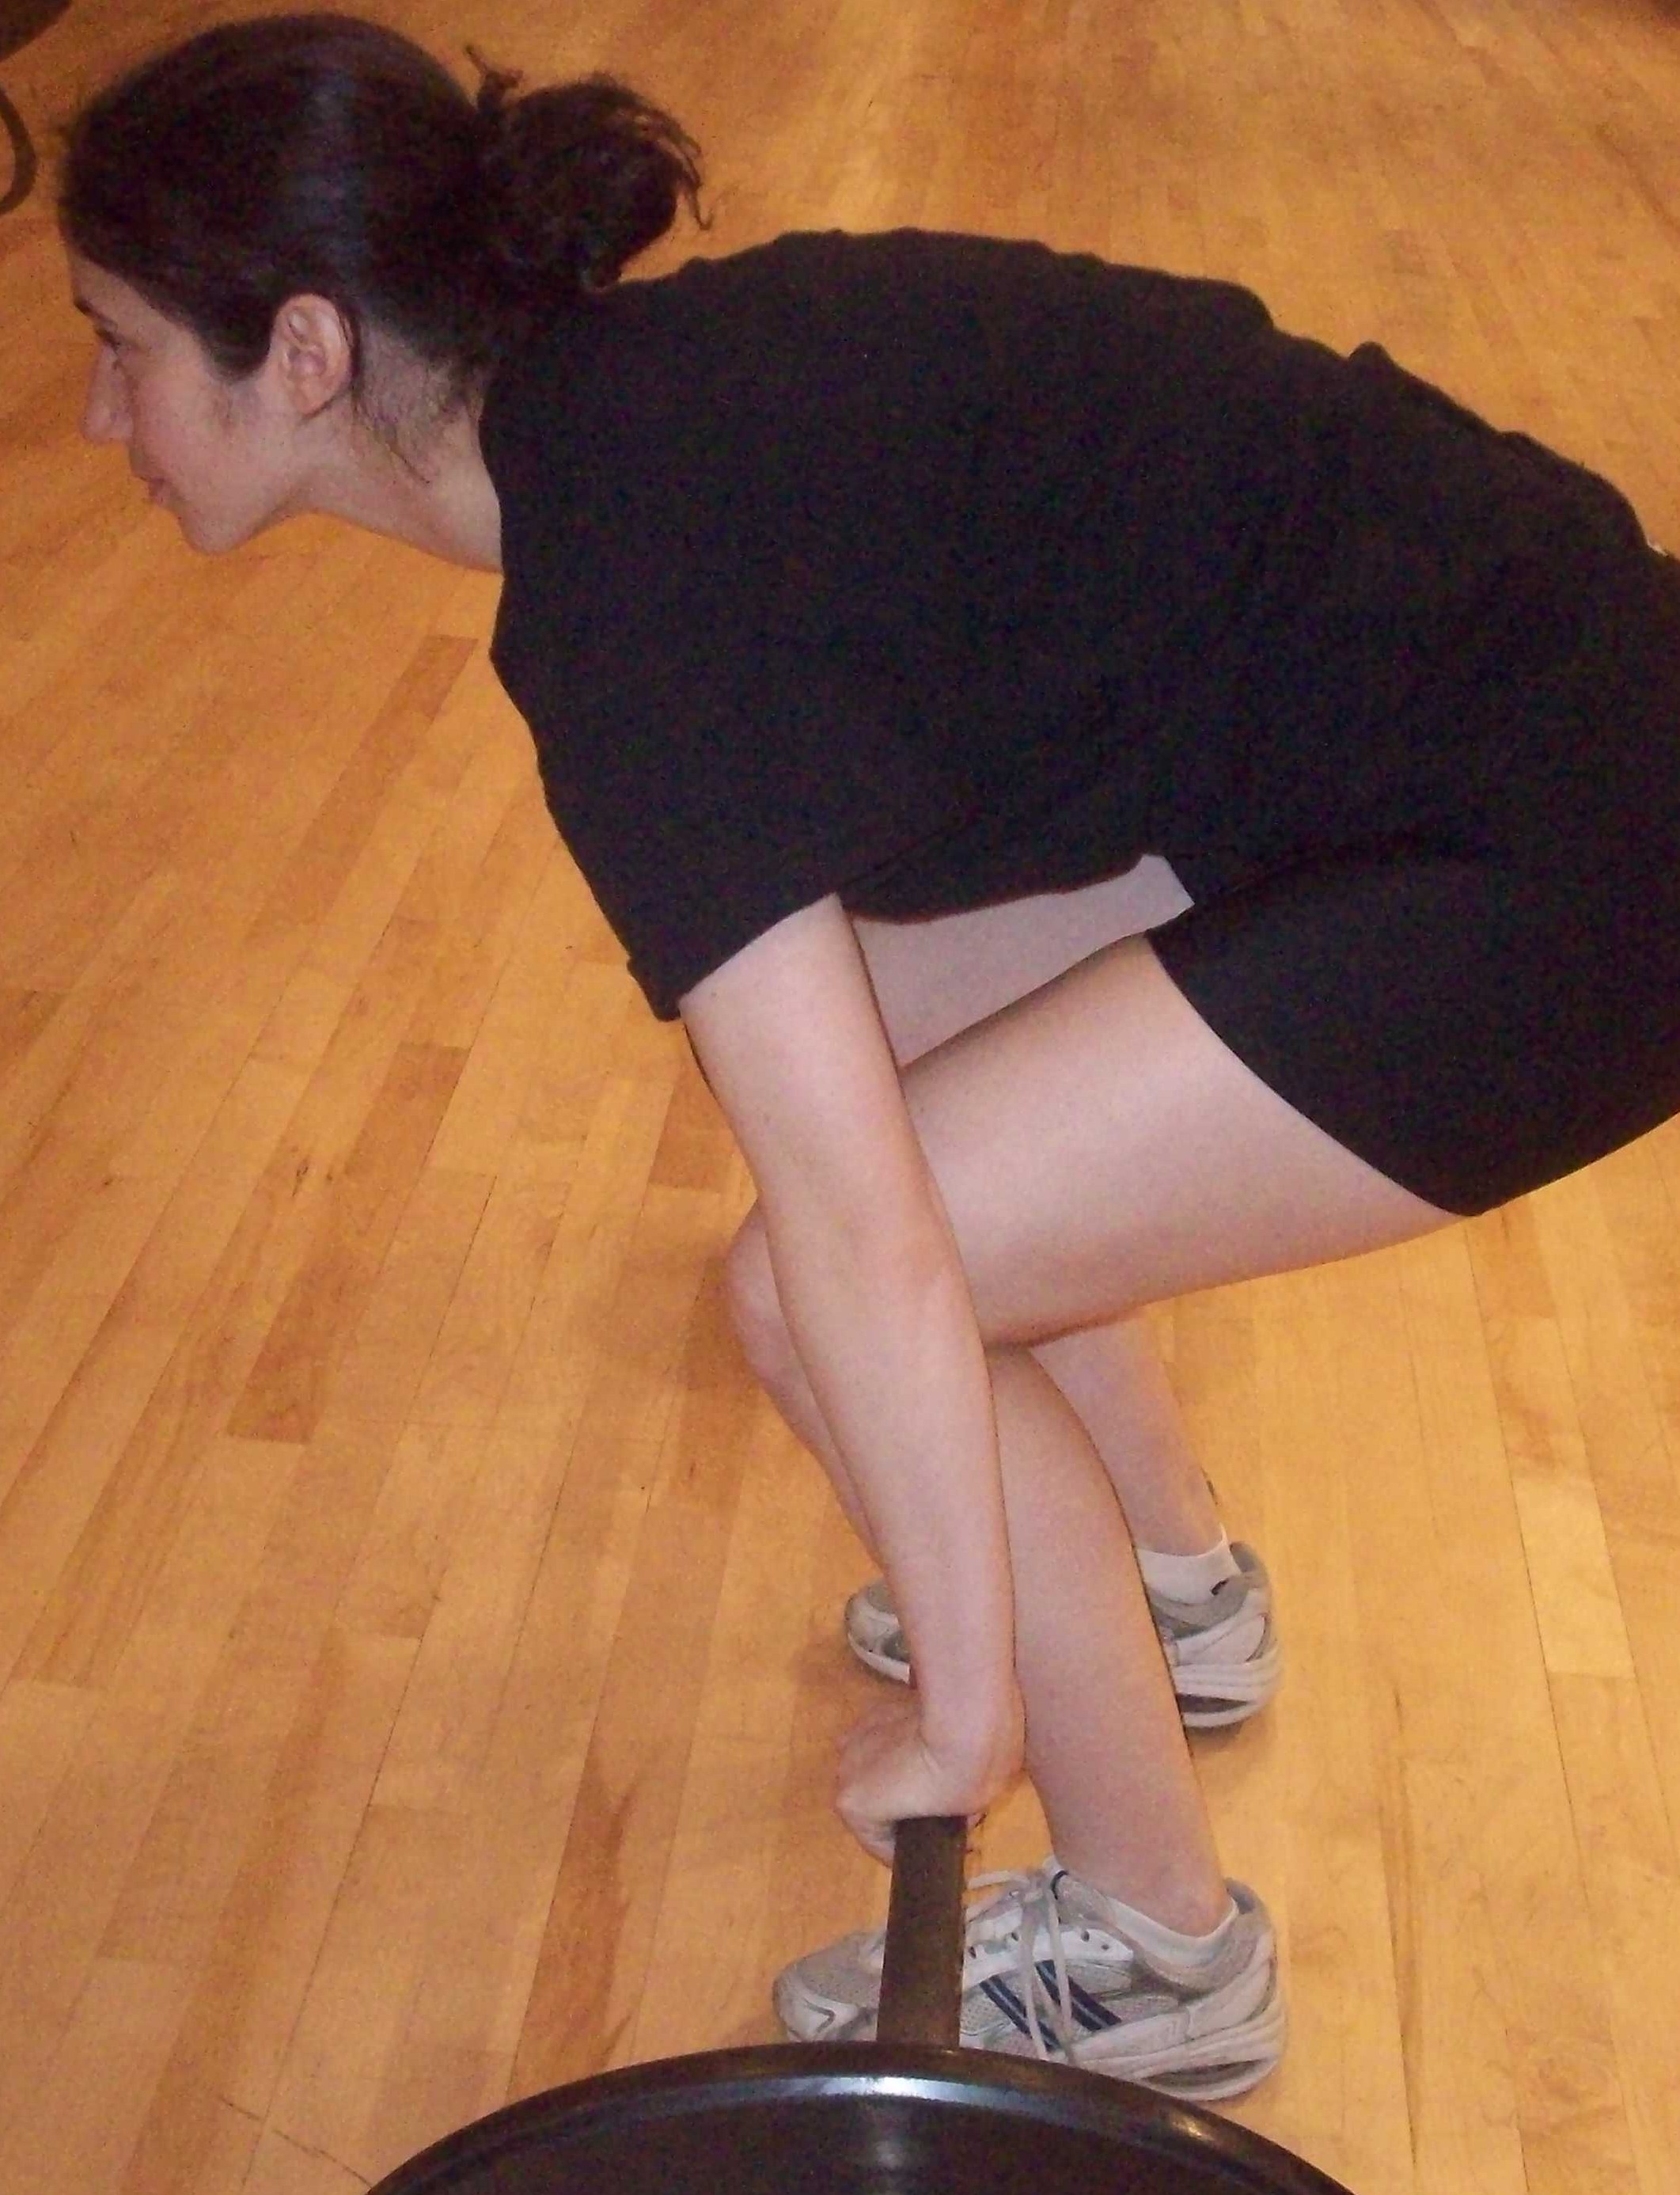
Starting Form
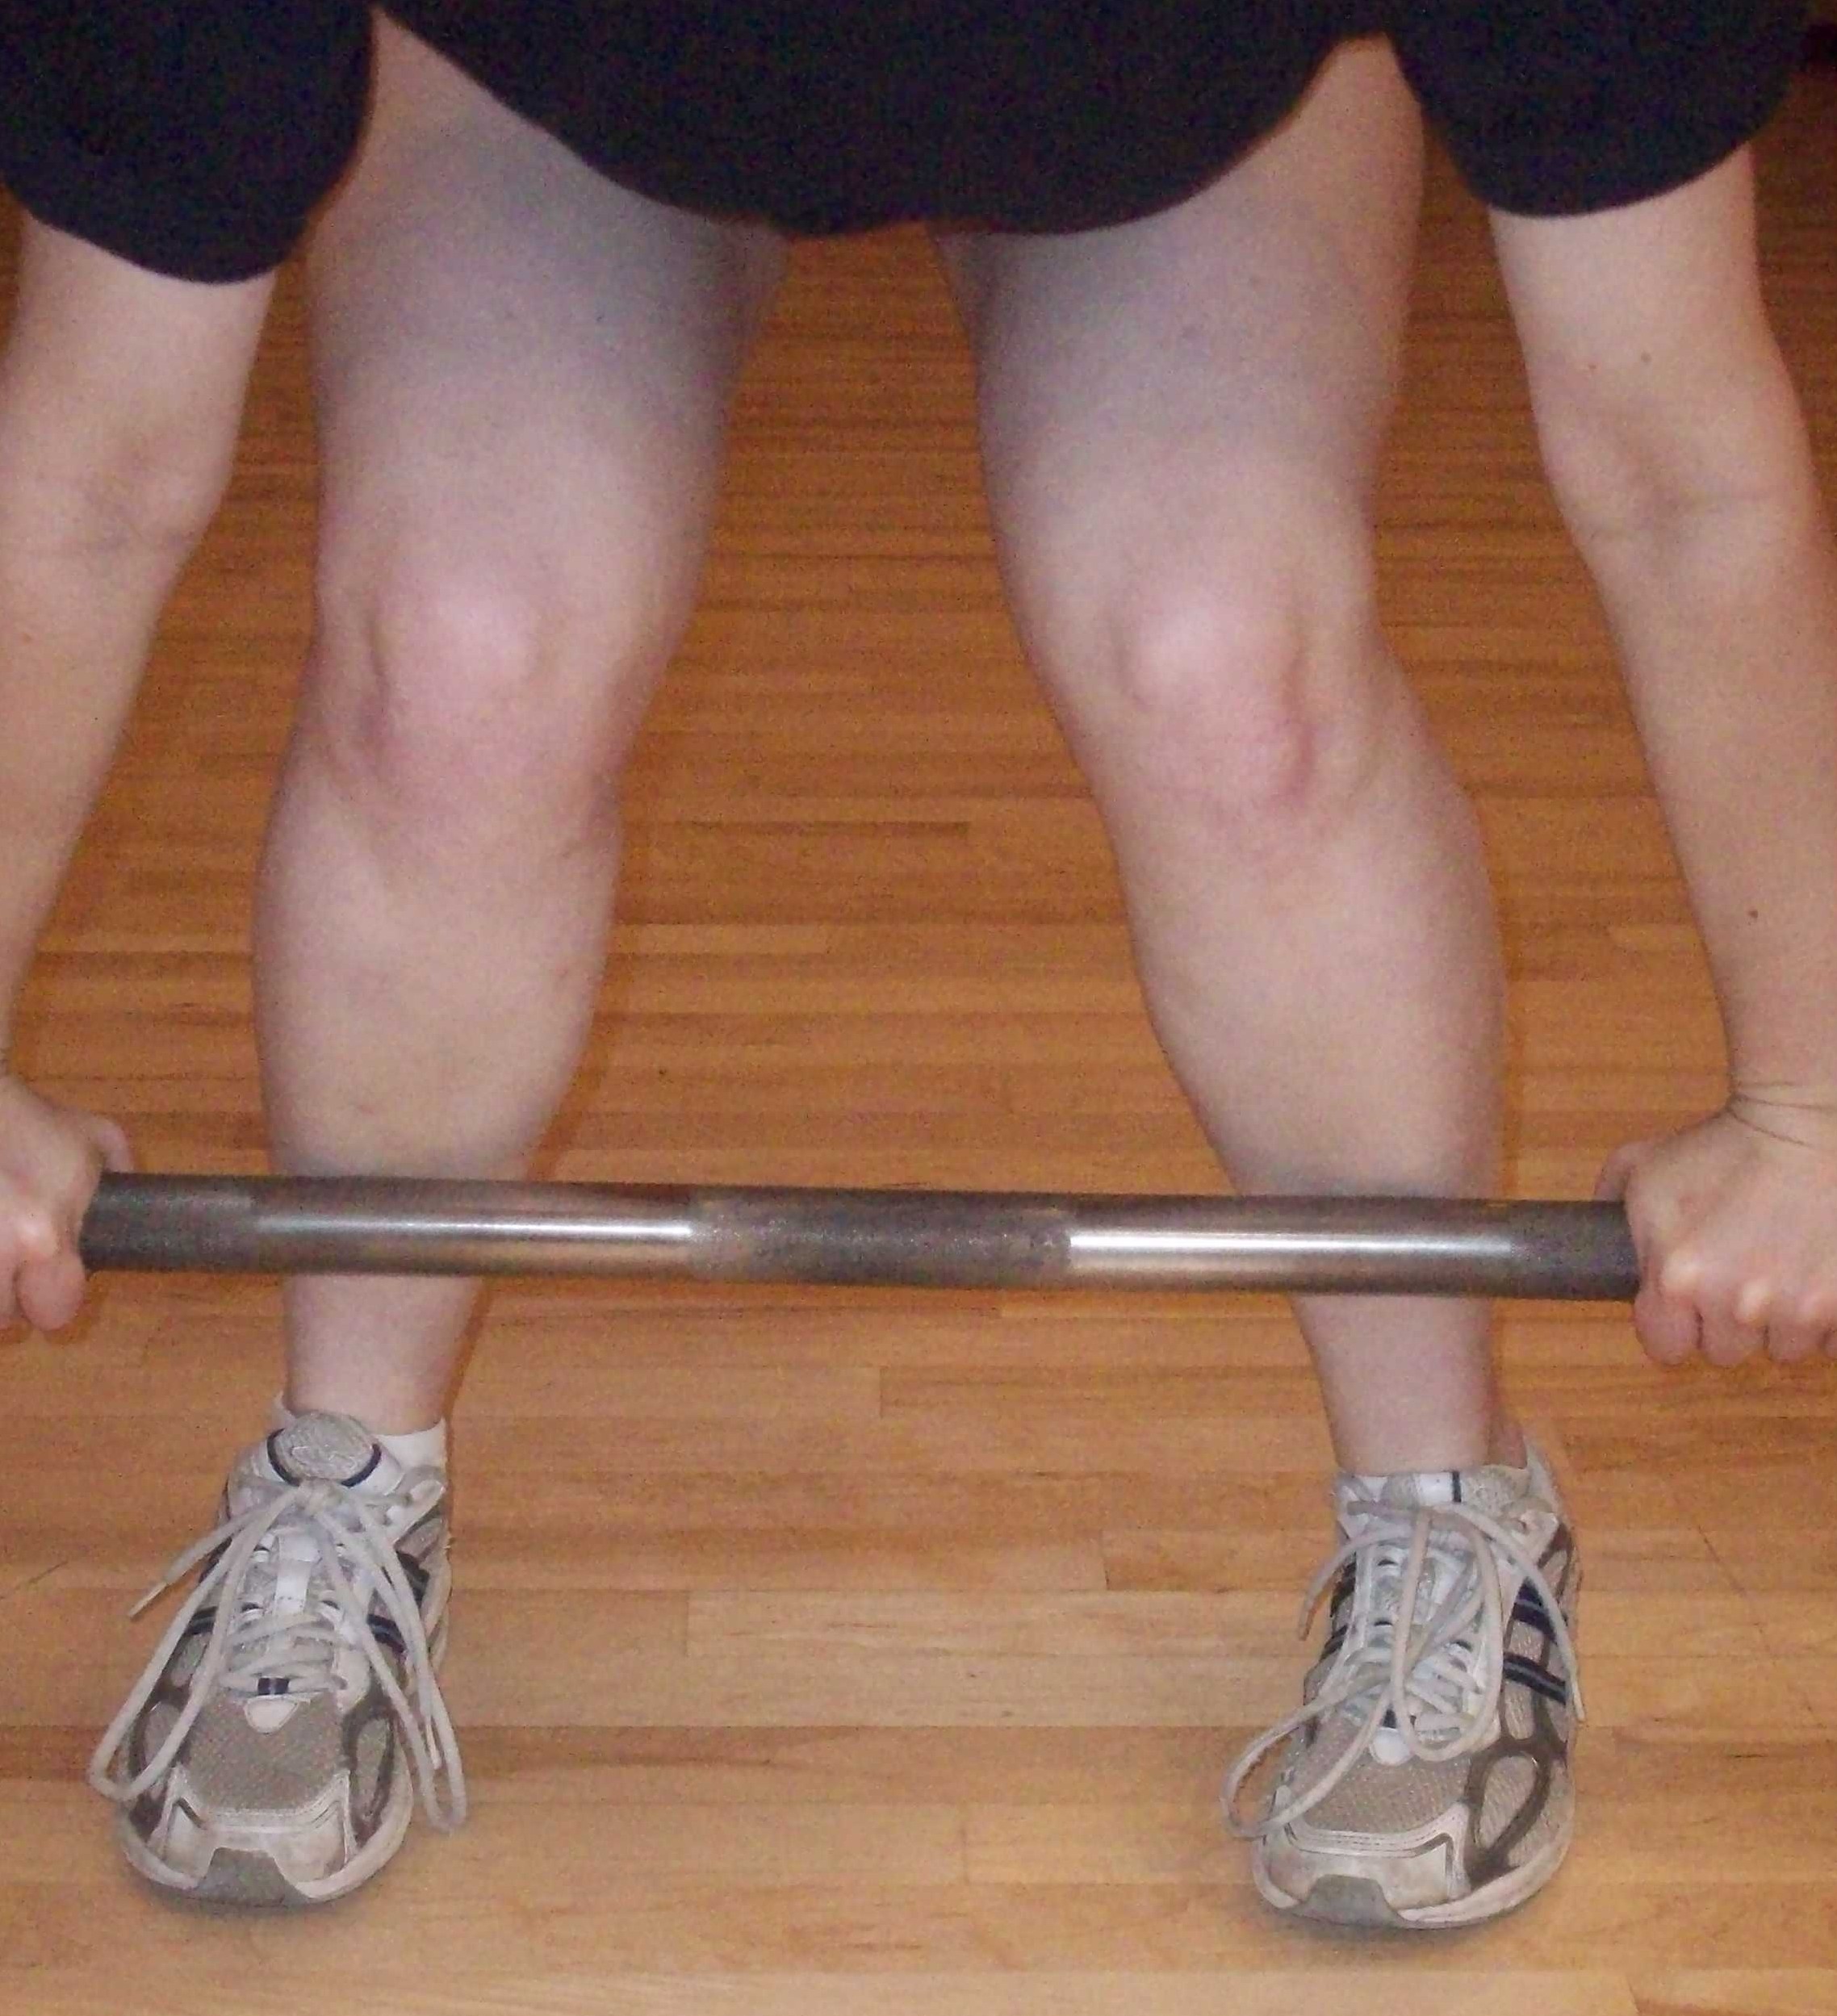
Follow these points to have the proper bottom position for a standard (not sumo or other variation) deadlift.
- Line your feet up between hip and shoulder width apart, toes pointed forward to no more than 30 degrees of outward rotation.
- Bend forward and grasp the bar with an overhand grip. Grip width should be placed so that your hands are directly outside your legs, but not so tight that they prevent your knees from staying in line with your toes when bent.
- Pull the bar to your shins so it lies over your midfoot, and pull your hips down. Keep your entire back flat (extended upper and lower back). Your hips will not be as low as in a squat – your thighs will not be parallel to the ground. Hips should be slightly higher than knees.
- Your shoulders should be positioned slightly in front of the bar. Arms should be straight.
- Chest should be up and your neck should be neutral (in line with your chest – not looking up or down).
- Pinch your shoulder blades down and back, and keep them this way for the entire lift.
- Your lower legs should be approximately perpendicular to the ground, not angled far forward as in the squat. It will be difficult to keep your balance without continuing to pull the weighted bar into your shins and also applying a small amount of upward force.
The Pull
- Take a deep breath and hold it (a Valsalva manuever) prior to the pull. A small amount of air will be released at the top of the pull, but do not deflate your torso or you will lose stability.
- Begin pulling off the floor by straightening the knees only enough for the bar to clear them in a vertical line. Think about squeezing the weight up to prevent jerking the bar off the ground and losing form.
- The bar should maintain contact with your legs for the entire lift and should travel in a straight vertical line.
- Once past the knees, continuing pulling the bar directly vertically by simultaneously straightening your knees and hips. Your back should have been straight the entire time so I will not tell you to straighten it.
- Knees and hips should finish together – that means your knees open at a slower rate than your hips.
The Finish
- Finish with the bar hanging from the hands, against the thighs/hips, body fully erect.
- If your goal was only to lift the weight (concentric exercise) – and you are using bumper plates on a safe surface – you can now carefully drop the weight as you take a step back.
- If you want to perform the eccentric part of the exercise (not necessary with very heavy attempts) or you are using metal plates, you will also be lowering the weight. Make sure shoulder blades are still down and back, neck is still neutral, lower back is still flat. Push your hips back while unlocking but not bending your knees. Keep the bar pressed against your legs. When the bar is approximately at knee height, start bending your knees and continue bending hips. Lower legs should not angle too far forward. You should end up in the same position you started in.
- At no point should you relax and allow your lower back to round. Injuries happen when lifters are tired from a set and lazy and don’t maintain form when putting the weight back down.
-
- Sideview Starting Position
-
- Backview Starting Position
-
- Front View Starting Position
-

- Incorrect Back Posture
-
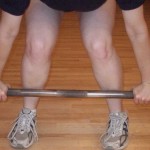
- Incorrect Knee Position
-
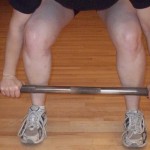
- Correct Knee Position

-
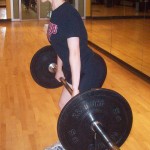
- Side View of Midstance
-
- Back View of Midstance
-
- Front View of Midstance

I hope this is useful and clear so that you can add a safe and powerful deadlift to your exercise routine. For more detailed information, please check out Starting Strength Basic Barbell Training, by Mark Rippetoe. The third edition is on pre-release sale right now. I hope to have pictures of correct form on the website soon.
Demystifying calorie math
FACT: Weight loss or gain is dependent on calories in vs. calories out.
Let’s elaborate on that statement. If you want to lose weight, you need to expend more calories than you take in, and vice versa to gain weight. It is all just math.
So, how to determine whether your calories are net positive or negative? The easiest way over the long term is to keep a consistent intake and simply see if you gain, lose, or maintain your weight. However, if you want to be more exact and be able to track calories on a daily or weekly basis to make the change more manageable, you could use one of the following formulas to get a decent estimate of what you burn in a day.
The information about yourself you will need consists of: body weight (in kg), height (in cm), and age (in yrs). Plug those numbers into this formula for your basal metabolic rate (how much energy you expend at rest). Because the formula is sex specific the letter “S” means add 5 to the total if you are male or subtract 161 from the total if you are female.
Calories Burned = [(10.0*weight)+(6.25*height)-(5.0*age)] + S
As an example, I am 69kg, 168cm, 30yrs old, and female. My basal metabolic rate would be 1,429 kcal burned at rest per day.
If you happen to have had your body fat measurements taken and know your amount of lean mass, you would be able to plug that number into a different formula to calculate your resting metabolic rate. Resting and basal metabolic rates, for everyday purposes, are the same basic concept. Use this formula with your lean body mass:
Calories Burned = 500 + (22*lean body mass in kg)
These numbers are useful because they give you an approximate starting point for the number of calories you burn each day. The number only accounts for when you are at rest, so you would need to add in more calories for any activities throughout the day (walking, reading, lifting weights, driving, shopping, swimming, carrying your 9 month old, etc). There is a method for figuring out estimates for all daily activities, but it is rather tedious. With these baseline numbers you can at least start figuring by trial and error how many more calories beyond the baseline are appropriate to help you achieve your specific weight goal (to gain or to lose). Remember, a pound is worth 3500 calories, so a difference (plus or minus) of 500 calories a day would equal a pound a week.
Later on we will talk about figuring out how the calories for the day should be divided for specific goals!