An Apple A Day…

You know the rest.  But no, this isn’t a nutrition posting; it’s actually some information about shoulder health and safety.  As these exercises can also be done for hypertrophy to improve a bodybuilders physique, the topic has been double categorized under “Fitness Tips” and “Corrective Exercises”.  What I’m writing about today are exercises for your Rotator Cuff musculature.

What is the Rotator Cuff?  It is a group of 4 muscles in and around your shoulder joint.  The area referred to as the shoulder is complex and involves multiple joint interfaces, but for our purposes we will be referring to the glenohumeral joint (the ball-and-socket), as that is what the muscles primarily affect when they act.  Those muscles are:

Supraspinatus: acts to abduct your arm (raise it up to the side)

Infraspinatus: acts to externally rotate your upper arm (turning out your pockets)

Teres Minor: also externally rotates your upper arm

Subscapularis: acts to internally rotate your upper arm (wrapping your arms around yourself)
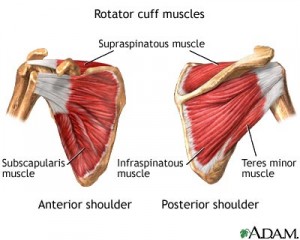
View of the RC

Collectively known as the SITS muscles, they act together to stabilize the “ball” (humeral head) of your upper arm (humerus) in the “socket” (glenoid fossa) of your shoulder blade (scapula).  When these muscles are injured or weak, the ball can shift around in the socket, causing further weakness and instability in the control of your arm.  Often, a chronically unstable shoulder leads to injuries such as subluxations, tendinitis, or neuropathies.

Who wants that?!  No one!  So what should you do to ensure a stable shoulder joint and prevent putting your orthopedist’s children through college?  Here are a few exercises to add to your workouts that should be done every other day or so (every day if you have a history of ball-and-socket problems).  They should be done for volume (high reps) with a lower intensity (weight) because these are postural muscles, programmed for the high endurance job of maintaining the same position all day.  They should also be done at the end of the workout to avoid them being too fatigued to assist you in correctly executing your upper body exercises that day.

1) Empty Can (for supraspinatus): stand upright with good posture, arms down at your sides.  As you raise your arms up and out on a 45 degree angle (not straight to the side, not straight out in front), keep your thumbs pointed towards the ground (as if you were emptying a can of its contents).  Do not raise your arms higher than shoulder height and, in fact, it’s not necessary to go more than 30 degrees up because that is when your deltoid muscle takes over the movement from the supraspinatus.  Traditionally the exercise is done to shoulder height, though.  Perform 3 sets of 10-15 repetitions.  Add weight conservatively as the exercise becomes easier.
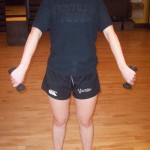
Empty Can
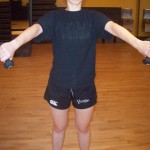
Empty Can Finish

Empty Can Sideview


2) Side-Lying External Rotation (for infraspinatus/teres minor): lie on one side on the ground or a bench, say your left side.  Have a rolled up towel held under your right arm, against your side, to keep your arm from being flush against your side.  This puts the shoulder in a better anatomical position for the exercise.  Begin with your right elbow bent to 90 degrees and your forearm across your abdomen.  Keeping your upper arm in line with your torso the whole time, roll your right forearm out away from your torso, towards the ceiling and then slowly back down again.  Do not rotate too far – if your right hand is going behind you, you are way too far.  Perform 3 sets of 10-15 repetitions.  Add weight conservatively as the exercise becomes easier.
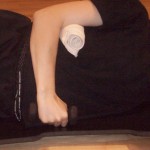
Side-Lying Dumbbell External Rotation
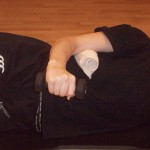
Side-Lying Dumbbell External Rotation Upper


3) Standing 90-90 External Rotation (for infraspinatus/teres minor): this is one of the many variations on external rotation exercises.  Stand upright with good posture (shoulder blades back) with your back against a wall.  Raise your arms up to 90 degrees (but not more) against the wall.  Bend your elbows to 90 degrees and place your forearms and the back of your hands flat against the wall.  Slowly let gravity rotate your arms downwards so your palms are facing the floor (elbows still bent) and then actively roll them back up to the wall again.  Perform 3 sets of 10-15 repetitions.  Add weight conservatively as the exercise becomes easier.
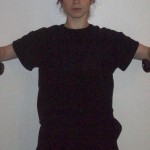
Standing Dumbbell External Rotation
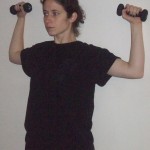
Standing DB External Rotation


It’s rare that anyone needs to exercise their subscapularis, as most people’s internal rotators are overly developed and tight.  But for the sake of being thorough, here is one exercise.  Do not overdo it.  It is far more common to need work on the external rotators mentioned above.  Always do more external rotator work than internal unless you have a diagnosed injury.

4) Standing Cable Internal Rotation (for subscapularis): stand with a cable machine to your right side, cable in your right hand, rolled up towel (again) under your right armpit.  Maintaining the same good posture and arm positioning as for the Side-Lying rotation exercise, pull the cable and rotate your forearm in towards your body it touches your abdomen.  Then slowly release the cable back out again.  Your elbow should always be bent to 90 degrees, as if your forearm were sliding along an invisible table top in front of you.  Do not let the cable yank your arm out, and do not rotate out to the side past your torso.  Perform 3 sets of 10-15 repetitions.  Add weight conservatively as the exercise becomes easier.  **This can also be done as another external rotation variation if you turn and face the other way.
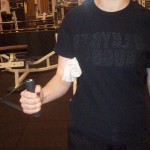
Standing Cable Rotation
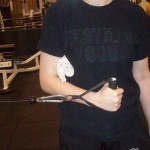
Standing Cable Rotation2


Now you have a starter packet for shoulder health and safety.  Not only will these exercises help keep you out of the doctor’s office, but they will make you stronger.  When your weightlifting hits a plateau, make sure you are keeping up your rotator cuff strength, as that step has been shown to reinvigorate the upper body’s ability to handle heavier weight!  Stable little muscles make bigger muscles fire more effectively and keep optimal alignment for torque, which means you can push more people around.  Happy lifting!

What To Do When You Don’t Know What To Do – Part II

So you’ve figured out the time frame for your macrocycle that will get you to peak performance around competition/event time.  Your transition phase will depend on how conditioned you usually are, the intensity of your event(s), and the time frame until your next competitive phase.  For instance, I took two weeks at the end of my rugby season to do nothing but rest, foam roll, stretch, and mobilize my ankles and hips.  (It was amazing.)

The remaining months are your preparation phase, which is divided into two parts.  General preparation refers to overall physical conditioning (you could think of it as general physical preparedness, or GPP) and often initially includes setting a solid aerobic base for future exercise.  It can also include general mobility, flexibility, and correction of imbalances that occur over a competitive season.  Think of this time as making yourself more of a “Renaissance Man/Woman” at first, with an eye towards your weaknesses and ultimate goals.  This is also usually when hypertrophy training would take place.  Get a better cardio base, balance out your imbalances, and get bigger muscles.  Often these workouts will be higher volume (more reps) and lower intensity.

As you progress through your general preparation, you can change the emphasis of your workouts from endurance and hypertrophy to strength.  You got fitter and bigger, now use that size and endurance to lift some heavy sh*t and get stronger.  Accordingly, your volume will decrease (less reps) and your intensity will increase (darn heavy).  You will also begin to integrate some sport specific activities (certain skills or drills that need work) but will not overdo the volume on those activities.

You’ve gotten fitter, you’ve gotten bigger, and you’ve gotten stronger, now get faster.  The last section of the general preparation phase is most often a power phase.  These workouts will be very high intensity for low reps to prevent overuse injuries and central nervous system burnout.  At this time you will also fully integrate sport specific drills, bringing you into the specific preparation part of the preparation phase.  This is when you really focus in on exactly the movements and skills needed for your competition and very little else.

Each focus of the general and specific preparation portions of the preparation phase, in case you haven’t guessed, is a mesocycle.  A mesocycle is simply the time frame for whatever you are focusing on in your workouts (ie. endurance, strength, power), and can last anywhere from 2 weeks to months.  The number of mesocycles in your preparation phase depends on how many different things you will be focusing on at different times, which will also determine the mesocycle length.  Periodization is traditionally linear (high volume/low intensity endurance –> low volume/high intensity power) but can be random as well.

At last, you’ve planned your preparation time frame and decided what you want to work on during that time – whether it’s strength, power, strength-endurance, or all of the above.  Now for each mesocycle, planning your microcycles is simply making your weekly workout plan.  Pick some exercises you want to work on to do your strength routine, decide whether you want do add some prowler work or burpees for your endurance, determine whether or not you are strong enough for proper box jumps during your power phase, etc; and put down the desired reps/sets/rest scheme.

Of course, you really only need to plan the first portion of your general preparedness because subsequent workouts will depend on your progress during each mesocycle.  And don’t be afraid to edit as you go.  If you didn’t make it as far as you needed or wanted do during your strength phase, add another week or two or three, or come back to that in a different mesocycle again later if you have the time and feel it is crucial.  Lastly, be sure to program in deload time so you can make it to your competition phase in one solid, ass-kicking piece!  Happy programming!

What To Do When You Don’t Know What To Do – Part I

Fall sports seasons are finally over – don’t be fooled by the 50 degree December weather – and that means it’s time to plan the off-season.  I’ll be honest with you, folks; sitting down and figuring out a workout plan for myself for the next several months is low on my list of favorite activities.  But it must be done so that I don’t end up as one of those people wandering aimlessly around the gym, doing a set here and there, hanging out on the bench and texting, etc, etc….  If you already ARE one of those people, put the magazine away, get off the stationary bike, and let’s talk about periodization.

Periodization can, at first, seem rather complex and, in the case of elite competitive athletes, be dizzyingly intricate.  But the concept itself is actually simple: training for different physical goals during consecutive time frames throughout the year.  This can be adapted for ANYONE with any goals!

The first steps are to nail down your ultimate goal(s) and determine the time frame for achieving the goal(s).  For instance, you may be an athlete preparing for your next competitive season with specific weaknesses to hammer out, or someone preparing for an important life event who wants to fine tune their physique.  Once you have the goals and time frame, you can plan your cycles.

Macrocycle: usually about a year’s time, but can be shorter

Mesocycles: anywhere from weeks to months long depending on how many different goals you have

Microcycles: usually a week for ease of planning workouts

The macrocycle usually has 3 parts: preparation, competition, and transition.  Preparation will be general and specific and gets you ready for your main event.  Competition can be a single event, a few events, or an entire season lasting several months.  Transition is the rest period needed after all that time of training and competing.  As this is cyclical, you then come back around again to preparation, where you evaluate a new set of goals and a new time frame!

The length of your preparation phase depends on whether you want to be at peak performance (or physique) at the beginning of the competition phase or at some point during the middle or end (ie. playoffs).  Decide this and then you can split the preparation phase into its sections: general preparation and specific preparation.